Sidewalk Portal Help All help pages

More ways to choose

What this page is for: the detailed page: your own height, by size, one by one, or an area you draw on the map.

Want more control? Use the detailed page.

  1. On the Choose your repairs page, click More ways to choose (your own height, one by one, on the map).
  2. You see tabs along the top: Our options, Set your own height, Pick individually, Everything. You may see fewer.
  3. Click the tab you want. It turns green.
  4. The option you pick gets a green outline.
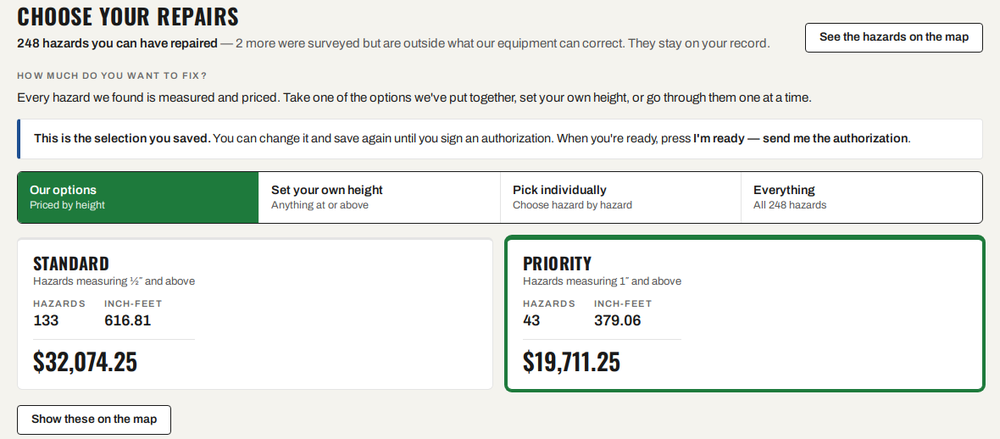
The detailed page: the Our options tab in green, and the Priority option outlined green
Demo project.

Save on the detailed page

The price and the green Save my selection button sit in the dark bar at the bottom of the page.

  1. Pick what you want.
  2. Check the hazards and the price in the bar.
  3. Click Save my selection.
  4. Sure? Click I’m ready — send me the authorization.
The dark bar at the bottom: the price, the hazards and the green Save my selection button

Set your own height

  1. Click the Set your own height tab.
  2. Type a height in the At or above box. For example, 3/4.
  3. Or click one of the quick buttons, like ½″ and up.
  4. Want a top limit too? Type it in Up to (optional).
  5. Check the hazards and price.
  6. Click Save my selection.

Select by size

Sizes are by how tall the hazard is:

  • Small: under ½ inch.
  • Medium: ½ inch to under 1 inch.
  • Large: 1 inch and over.
  1. Click the Pick individually tab.
  2. Find Select by size at the top of the list.
  3. Click Small or Medium. Every hazard of that size gets ticked.
  4. Click Save my selection.

Some large hazards say Replace panel (recommended) and have no tick box. Ask your representative about those.

Pick individually

  1. Click the Pick individually tab.
  2. Tick the box next to each hazard you want.
  3. Use Search by street to find a street.
  4. Use Sort to sort by number or by height.
  5. Want to pick on the map? Click Show these on the map. Tap pins to tick or untick them.
  6. Use Select all or Clear to start over.
  7. Click Save my selection.

Rows marked One repair are one long run of sidewalk. They tick together.

Hazards we can’t repair are hidden. Click Show hazards we can't repair to see them and why.

Everything

  1. Click the Everything tab.
  2. Click Save my selection.

Priority areas (draw on the map)

Draw a shape around a place that matters, like a school or Main Street. The portal counts the hazards inside.

  1. Click See the hazards on the map.
  2. Scroll down to Priority areas.
  3. Click Draw an area (any shape) or Draw a circle.
  4. Click on the map to draw it. For a shape, click each corner.
  5. Give the area a name, like "Lincoln Elementary".
  6. Read the line under the map: how many hazards, their sizes and an estimate.
  7. Want them? Click Select these for repair. They are saved as your draft choice.

Drag a corner or edge to change an area. Use Rename or Remove to tidy up. Viewers can see areas but not draw them.

Whatever way you use, saving is only a draft. Nothing is ordered until you sign.

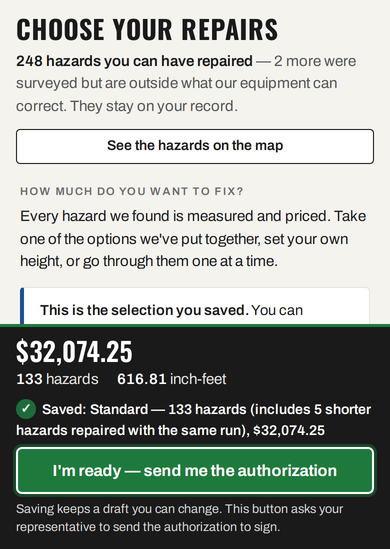
On a phone, the price and the green button stay at the bottom of the screen.

After you save, it says ✓ Saved, and the green I’m ready — send me the authorization button appears.

The detailed page on a phone, with the price, Saved, and the green I’m ready button at the bottom
On a phone. Demo project.

Stuck?

No Save button? You may be a Viewer. Ask an Admin on your team.

Call or email your representative. Their name, phone and email are at the top of every portal page. No name there? Call the number at the bottom of every portal page.

← Choosing your repairsI’m ready, and signing →